Saturday 30 March 2013

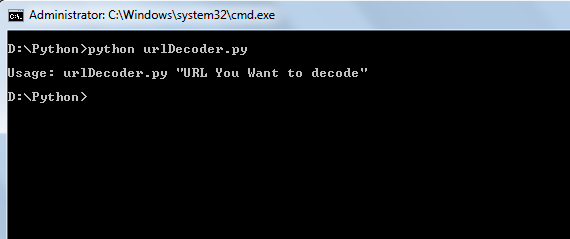
[Python] URL Un-shorten-er

Hi all,

I was playing with the BeautifulSoup library of Python. It is a very good library to parse and extract data out of HTML documents, even the ones that are poorly coded. So, while I was playing, I thought why not make something interesting. I looked around for inspiration and while browsing my Twitter feed, I came across many shortened URLs, why not demystify them? That's why, I wrote a small script to Un-shorten those URLs. I used a website, URLXray, to resolve the URLs. This is very naive script, I know. But still, that helped me in learning BeautifulSoup.

I'm a naive in Python, therefore, script may look a bit long.

Here's the code:


  1. #!/usr/bin/env python
  2. # Simple script to un-shorten the shortened URLs using the website - URLXray.com
  3. # Author: Rahul Binjve (@RahulBinjve)
  4. # Usage: ./urlDecode.py URL
  5. import urllib2
  6. from bs4 import BeautifulSoup
  7. import sys
  8. def main():
  9.     if len(sys.argv) < 2:
  10.         print "\nUsage: urlDecoder.py \"URL You Want to decode\""
  11.         sys.exit(1)
  12.    
  13.     result = decode(sys.argv[1])
  14.     print "\nDecoded URL is -> ", result
  15. #Decode function, all our work will be done here.
  16. def decode(userArg):
  17.    
  18.     url = "http://urlxray.com/display.php?url=" + userArg
  19.     print "\nUser provided URL -> ", userArg
  20.    
  21.     webPage = urllib2.urlopen(url)
  22.     tastySoup = BeautifulSoup(webPage)
  23.     div = str(tastySoup.find_all("div", class_ = "resultURL2"))
  24.     tastySoup = BeautifulSoup(div)
  25.     for a in tastySoup.findAll('a'):
  26.         if a.has_key('href'):
  27.             decoded = a['href']
  28.     if decoded:
  29.         return decoded
  30. #Standard Python Boilerplate
  31. if __name__ == '__main__':
  32.     main()


Thanks for reading.
Cheers.

Friday 29 March 2013

[Bash]Script to Check C/C++ Header Files

Hello all,
I just wrote a quick bash script to validate the header files from the C/C++ source file. This code just extracts the header file from the source code and runs a quick search in "include" folder, and prints the result. Nothing new, just wanted to write a bash script for learning and fun.

There are many improvements, still to be done. Ideas, suggestions and constructive criticism is welcome.
Here's the code:


  1. #!/bin/bash
  2. #
  3. # Description   : A quick 'n' dirty bash script for validating header files.
  4. # Author        : RahulB
  5. # Usage         : ./validate.sh SourceFile
  6. # Platform      : GNU/Linux
  7. # Greets to     : Anant Sir, Hackuin, b0nd bro, and all g4h members.
  8. #
  9. if [ ! $# = 1 ] ; then             #Checking for exact one command line argument
  10.         printf "Usage : $0 SourceFile \n"      
  11.         exit 1
  12. fi
  13. if [ ! -s $1 ] ; then          #Checking file's existence/ sufficient privilege
  14.         printf "Error : Either file doesn't exist or you don't have sufficient privileges. \n"
  15.         exit 1
  16. fi
  17. declare FILENAME="$1"
  18. declare EXT="${FILENAME##.*}"           #Extracting file extension
  19. declare WD=$(pwd)                       #Saving current working directory
  20. declare VDIR=$(ls -F /usr/include/c++/ | grep '/')  #Extracting version directory
  21. if [ "$EXT" = "cpp" ] ; then       #Determing whether it's C or C++ by file extension
  22.         DIR="/usr/include/c++/$VDIR"    #C++ include directory
  23. elif [ "$EXT" = "c" ] ; then
  24.         DIR='/usr/include/'             #C include directory
  25. else
  26.         printf "Error : Use .cpp for C++ and .c for C source files.\n"
  27.         exit 1;
  28. fi
  29. cat $1 | grep '#include' | cut -d '<' -f2 | cut -d '>' -f1 > demo.log  #Extracting header files' name
  30. cd "$DIR"                                  #Changing directory to include folder
  31. for LINE in $(cat "$WD/demo.log")          #Line-by-line processing
  32. do
  33.         if test -s "$LINE" ; then          #Checking if header file exists or not.
  34.                 printf "$LINE exists. \n"
  35.         else
  36.                 printf "Check the header file $LINE\n"
  37.         fi
  38. done
  39. printf "\n\n"
  40. exit 0                       


Thanks and Regards.
Cheers.

Thursday 28 March 2013

Why you should use Indentation?

Introduction:
If you've been programming from quite a time, then this article might not be of help to you, but if you've just started or planning to start then read on. I'll be discussing one of the issue that I faced few months ago when I started programming, and what I see in almost all newbies. Yes, as the title suggests, it's Indentation. A rather non-technical and not compulsory but an important and useful thing.

What is Indentation:
In computer programming languages, indentation is used to format program source code to improve readability. Indentation is generally only of use to programmers; compilers and interpreters rarely care how much whitespace is present in between programming statements. However, certain programming languages rely on the use of indentation to demarcate programming structure, often using a variation of the off-side rule. The Haskell, Occam, and Python programming languages rely on indentation in this way.
Indentation - Wikipedia, the free encyclopedia

Example:

So we can see that Indentation is nothing but formatting the source of our program (by the help of tab/ spaces) in such a way that it increases readablilty. Lets look at a pseudo-code :


  1. main() {
  2. variable declaration;
  3. for loop {
  4. another for loop {
  5. yet another for loop {
  6. some work to be done;
  7. another work;
  8. }
  9. again some work;
  10. }
  11. damn some more work;
  12. }
  13. }


Seems horrible? Huh? Thinking that who really code like this in real life? Trust me, I've been watching hell lot of people coding like this front of my eyes. And it hurts.

Warning: If you code like this, then I've some bad news for you.. :P (If you know what I mean :P)


Cure to this horrible dream lies in Indentation.
Now lets have look at indented brother of above code:


  1. main() {
  2.         variable declaration;
  3.         for loop {
  4.                 another for loop {
  5.                         yet another for loop {
  6.                                 some work to be done;
  7.                                 another work;
  8.                         }
  9.                 again some work;
  10.                 }
  11.         damn some more work;
  12.         }
  13. }


When we look at this code, we can clearly see that inside our main(), we have a nested for loop. It certainly is more readable, and understandable than his illiterate/ mis-managed brother.

Hope I've demonstrated you the importance of Indentation.

Few good reasons to use indentation :
  • It shows levels of nesting, nested if statements , for loops, etc :
As shown above, indenting you code tell you when and what is nested inside what. Confusing? For example, you've asked to WAP that takes input of all elements of a 2D array. So simplest logic says, you'll use a for/ while loop and inside that another for/while loop. So writing the code w/ proper indentation helps you in identifying the nesting level.

  • Anyone reading your code can tell whats executing inside of what :
Obviously you'll not use your own code in an isolated chamber for the life time, don't say you will. You'll obviously share you code (until you're Windows/ Apple fanboy), and others will read it and may want to modify it. And in order to be able to modify, one must be able to understand flow of execution of program, which is possible only if code is correctly formatted, commented and indented.

  • It shows scope :
It's clear that if everything is indented you know the scope of variables. As in the above example, if the code's indented, you can easily understand which variables are available where. And it also shows that where a specific block is starting and where it's ending.

  • Easier to read :
I don't think I need to explain this point. If you still want explanation, read the above two examples again.

  • Better programming sense :
Writing a nicely indented code clearly shows that you've a clear sense of what you're writing and you certainly know how to respect programming.


Points Source : Why is indentation important in c progaming . I've elaborated them by myself.

Another thing to note is that as stated above, some languages like Python mostly rely on the indentation to interpret your code correctly.


Tabs or Spaces ?

It has been a matter of unsolved debate from years that whether a programmer should use tab key or whitespaces to give indentation. Tabs are generally denied because tab length of different systems may be different. As one can set tab key as 2/4/8 spaces. So if a a programmer used 4 spaces tab, and reads it on a system with 8 spaces tab, it might disturb the formatting (though I use tab only :P).
However, whitespaces are always interpreted same on every system. But typing whitespaces everytime can be a hectic work if you've more than 2 levels of nesting.


What Indent-style should I use ?

Choosing indentation style is purely a matter of personal choice. However, some programming languages have developed or are generally coded in similar indent every time, it is not a compulsion to use a particular indentation style. Generally, indentation style varies from person to person. Some common/ famous indentation styles are :
1 K&R style
2 Allman style
3 BSD KNF style
4 Whitesmiths style
5 GNU style
6 Horstmann style
7 Pico style
8 Banner style
9 Lisp style
10 Ratliff style
Source : Wikipedia


Conclusion :

From the above points, it is very clear that while writing even a 20 lines program, indentation saves a lot of time that one might waste in reading and understanding again. It also increases readability to others and well as the programmer. This in turn makes it easy to understand the flow of program and scope of block, easy to debug and easy to modify.

I've tried my best to explain the importance of indentation to you. So I hope, those of you who've just started programming, like me, will be benefited  Comments, suggestions and rectifications are invited. Your comments motivate me to work better, and better.

Cheers.

Expect - Linux Automation Tool: Part 2

Hi all,
In this post I'll try to explain about spawn, interact and using command line arguments.. In last post, I told you that - expect, send, spawn and interact are some of the most imp commands in expect.

Lets see what they're in single line definition:

  • Expect : Expect command defines the string that is expected from the process. For example when we do ssh, it prompts for password as "password: ". Here "password: " is expected string.


  • Send : Send command tell us what is the value we want to send to the process, in this case of ssh, our password. Send feeds the value as if it's typed by any human.


  • Spawn : Spawn specifies the [interactive] command we want to execute, say "ssh user@server". Syntax is : "spawn command_to_be_executed"


  • Interact : Interact is used to pass the control to the spawned process. Interact returns the control to our script after the spawned process ends.


Command line arguments :
Command line args as we all know are the values/ arguments that we send to our script at the time of execution. Expect stores command line args in list.

Enough of theory, time to code. As Linus Torvalds has said, Talk is dirty. Show me the code.


  1. #!/usr/bin/env expect
  2. #####################################################
  3. # Filename:     su.exp                                 
  4. # Description:  Script to automate the granting of SU shell using expect
  5. # Author:       RahulB                         
  6. #####################################################
  7. if {[llength $argv] == 0} {
  8.         puts "Usage: ./su password"
  9.         exit 1
  10. }
  11. set passwd [lindex $argv 0]
  12. spawn sudo su -
  13. expect {
  14.         "password" {send "$passwd\r"}
  15. }
  16. interact


Now lets inspect the code.


  • In this we first check if the command line argument is given or not, if not we print error using puts and exit w/ error code 1.


Note: We've checked the length of list argv using the llength (yeah no typo, it stands for list length). Or we can use $argc. Both are same.


  • Then we declare the variable passwd. Variables are declared using "set". We read the first element of our list and stores it into passwd.


  • Then we invoke our interactive command, i.e "sudo su -" using spawn. Then the string "password: " is expect. When this string appears, we send our password, stored in variable followed by "\r".


Please Note: we're sending "\r", not "\n" because former is Carriage Return and latter is new line/ line feed. So it's like we entered our password and pressed Enter key.


  • At last we use interact to pass the control to the shell.


  • Save it as "su.exp" and make it executable by 

chmod +x su.exp


  • And run it as

./su.exp your_password

Hope it was easy and simple. Suggestions and rectifications invited.
Cheers.

Expect - Linux Automation Tool: Part 1

Introduction:

Automation of tasks is one of those bless that saves hell lot of time of any sysAdmin. Mostly automation is done through scripting. And in case of Linux, through bash or Tcl scripts. Scripts come handy in the case of tasks, which are repetitive or need to be done on a regular basis. But interacting with the application program that requires user's input, for example - partitioning, changing users' password, ssh, ftp, etc, is pretty time consuming. In this situation, "expect" is one such tool, that comes to rescue you.

What is Expect:

Expect is a program to control interactive applications. These applications interactively prompt and expect a user to enter keystrokes in response. By using Expect, you can write simple scripts to automate these interactions. And using automated interactive programs, you will be able to solve problems that you never
would have even considered before.
- Don Lines (Man behind Expect), in his book, "Exploring Expect"

So we can see using expect we can control the programs that require user inputs too. We'll soon see how. It is an extension to Tcl scripting language.

Some main commands:
  • spawn
  • send
  • expect
  • interact

We'll see how these commands work, by using a simple program:
Note: You might need to install expect, you can simply by "apt-get install expect".


  1. #!/usr/bin/env expect
  2. # hello.exp
  3. # Description: Hello world program in expect
  4. # Author: RahulB
  5. expect {
  6.         "hello" { send "world\n" }
  7. }
  8. exit 0


Now lets disassemble this, line by line..
1. First line is the shebang/ hashbang line that tells which interpreter to use.

2. Next 3 lines are the comment section tell us the info about code. Note that extension is .exp.

3. Next is the expect command. Expect command defines the string that is expected from the process. For example when we do ssh, it prompts for password as "password: ". So while writing writing a ssh code, we'll expect a "password: ".

4. In next line, we define what we are expecting or looking for, in this case "hello". and then there is send command, that tell us what is the value we can to send to the process, in this case hello.
Please Note: There are many other ways by which we can define this expect/send clause, I like this one. Matter of personal choice.

5. Last line returns 0 to show successful execution of script.

Cheers.
Thanks for reading. Please, leave your suggestions, etc in comments.

Gingerbread on Nokia N900

Note: This guide was originally written on 30-08-2013 and first appeared here

Pheww, so finally after messing badly with my friend's N900, I got gingerbread running. And after spending 3-4 nights w/ this phone, I must admit, I'm in love with it..
It took me 3-4 days because all the info is scattered here and there, and some things work, some don't. Finally after messing and flashing N900 5-7 times, I got what I was looking for..

Disclaimer : I'm not responsible for any damage done to your phone or you. Use it at your own risk.

If you wish to taste Android on N900 (I'm sure there's very few of you), I'd suggest you to try everything on a freshly installed N900. Just flash the eMMC and Firmware. Instructions are @ Updating The Firmware.
Then enable all the repositories - extras, extras-devel, and extras-testing by following instruction here.

Once you're done, just blindfold your eyes and follow the instructions given:

1. Download rootsh from here and install it.

2. Download NITDroid 12 "UMay" from here and kernel from here.

3. Transfer the downloaded content to root of the N900 (Remember internal memory).

4. Open X-Terminal and enter following commands:


root
apt-get update
apt-get install nitdroid-installer
y
y [again if it asks again.]


Remember though you've installed the installer,DO NOT RUN ANYTHING.
Now execute these commands on terminal:

cd /home/user/MyDocs 
bzip2 -d N12_UMay.tar.bz2 
cd /home 
mkdir /and 
cd / 
mount /home /and 
cd /and 
tar xvf /home/user/MyDocs/N12_UMay.tar.bz2 
dpkg -i /home/user/MyDocs/nitdroid-kernel-2.6.28-07_6-rc6_armel.deb

5. After this execute this command

vi /etc/multiboot.d/11[press tab to auto fill here]

Enter into insert mode and set

ITEM_DEVICE=mmcblk0p2


6. save and exit. Reboot the device w/ open keyboard.

7. When it boots, if you see something like this


Press 2 to boot into Android..

If everything goes well, you'll be tasting Gingerbread, else I don't know. Flash and try again. :P

NOTE : While using Android, power button works as "lock key", camera was not working for me (note: I'm using older version). Camera key was the "back key".

Resources :


Actually this whole procedure was on this and this. I've just compiled it in a easy manner.

Thanks.
Hope you'll enjoy.

Tuesday 5 February 2013

HackIM Programming 100, 200, 300, 400 Write-up

HackIM Programming 100, 200, 300, 400 Write-up

This is the write-up for Programming Level (100, 200, 300, 400), Nullcon HackIM CTF 2013. All the scripts below are written in quick n' dirty manner.
Authors: Rohit Sharma (SH_Rohit)
              Rahul Binjve (RahulB)

1.    Big Fib
The resultant term was very large, so we used python. The key had 31,348 digits.

Code:
Key: is very large. Run the code to see.


2.    Lazy Baba
This one was very interesting. :)

Code:


And then we put the Crontab entry as:
*/1 * * * * /usr/bin/python script.py >> ~/key.txt
i.e. Run script.py after every 1 minute and redirect its output in key.txt.

Key: ABRAKADABRAGILIGILIGILI

3.    Harmony in Series
C++ never gave us correct answer. So we rewrote it in C and Python. Both gave us answer. Here's the python snippet.

Code:


Key: 311180.65

4.    Funky Text
This one was really confusing. So we used, sed to add a space between each character and our bash script did the calculation. Here's our very raw solution.
We had the funky text in a file named 'text'.
Code:

Key: 557

Kudos to the Madprops, for creating awesome challenges.